# ☎️ 2: Use Axios to Call an API (intermediate)
| Project Goal | Learn how to build a simple app to fetch random cat images |
|---|---|
| What you’ll learn | The goal is to undertand the basics of making an HTTP call with axios |
| Tools you’ll need | A modern browser like Chrome/Firefox. Access to CodeSandbox (opens new window). |
| Time needed to complete | 10 minutes |
# Create a random cat picture viewer
You will be creating a simple Vue app that will make HTTP calls through Axios (opens new window) to a remote API to get cat images.
💡
API means Application Programming Interface. In very simple terms, it's a bunch of URLs to which we can make requests to either get or send data.
# Get Started
Head over to CodeSandbox (opens new window) and create a new Vue template (opens new window).
The sandbox will set up a new Vue application where we can write our code, and it will be automatically compiled and rendered in the window on the right.
# Preliminary Code Clean Up
Go to App.vue and remove everything from inside the div with the id #app and clear the <script> tag. In the end, your file should look like this:
<template>
  <div id="app">

  </div>
</template>

<script>

export default {
  name: "App",
};
</script>
2
3
4
5
6
7
8
9
10
11
12
The reason you're doing this is so that you have a clean slate without all the boilerplate stuff Codesandbox adds.
# Adding Axios to the project
Now you need to add Axios to the project!
Head over to the left side menu bar and click the Dependencies tab. Once it has expanded, click the Add Dependency button and search for axios. Click on it once you find it on the list and voilà, it's added to your project dependencies.
💡
Are you following this nano on a local development enviroment outside the Codesandbox environment? Install axios by running npm install axios or yarn add axios on your terminal on the project root.
# Importing the Axios library
Before you can start making all the cat-tastic HTTP calls, you need to add the axios library to your component.
💡
Just adding a dependency to the project doesn't automatically include it to your components. In Vue, you need to manually import the dependencies you are going to use.
Head to App.vue again and add this import statement directly below the opening <script> tag:
import axios from 'axios';
Now you can use axios on your component.
# Create the API call
It's time to prepare a function to call the Cat API.
Go inside the export default { } block and add a new method:
export default {
	name: 'App',
	methods: {
		fetchNewCat() {
			axios
				.get('https://api.thecatapi.com/v1/images/search')
				.then(response => {
					console.log('Search complete!');
					console.log(response);
				})
				.catch(err => {
					console.log('Search failed!');
					console.log(err);
				});
		},
	},
};
2
3
4
5
6
7
8
9
10
11
12
13
14
15
16
17
This may be overwhelming to see for the first time, so let's break it down in digestible pieces.
First, you are declaring a new method fetchNewCat that will take no parameters ().
Inside this method, you start our axios call by calling .get:
axios.get('https://api.thecatapi.com/v1/images/search');
Axios works with the so-called HTTP Verbs or HTTP Methods (opens new window). Here you are making a GET type call to the https://api.thecatapi.com/v1/images/search URL.
The most "common" ones are:
- GET - To GET information from an HTTP URL
- POST - To POST information to an HTTP URL
💡
Which method should I use? It depends! Working with APIs involves usually interacting with its creator or diving into the documentation. GET and POST are used 99% of the time, but some APIs (REST APIs in particular) may use a lot more.
Axios returns a Promise (opens new window), which is a JavaScript object that holds the response from an asynchronous HTTP call.
If this call succeeds, then the code inside the then block is executed. If there is a problem, then the code inside the catch block is executed.
In both cases you're just going to print the results to the console for now.
Let's quickly add a button to our app so you can call this API ad hoc.
Add this markup to your <template>:
<template>
  <div id="app">
    <button @click="fetchNewCat">New Cat</button>
  </div>
</template>
2
3
4
5
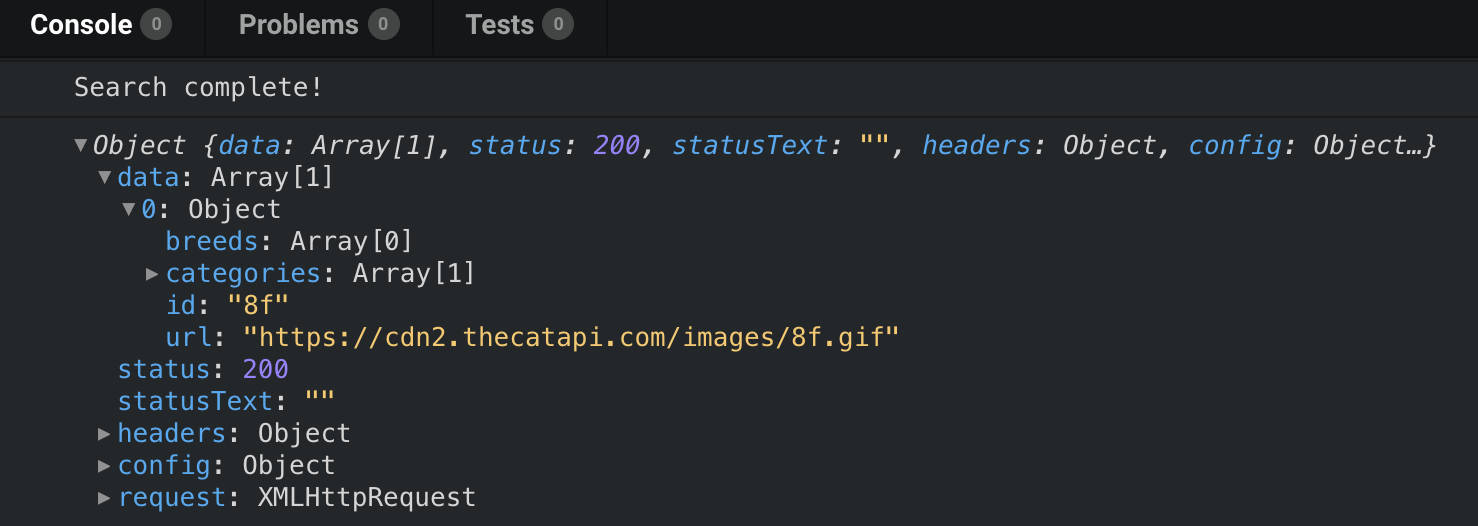
Go ahead and click on the button on the right hand screen and open up the Console tab on the very bottom of your screen.
You will see an output that is very similar to this:

This is logging the response parameter in our then block. You are getting back a JS Object with a bunch of data about the HTTP call you just made, like the status and headers.
Inside this object you also get a data array which holds the actual response that the API returned. In this case, it's another Object that holds the information for your cat picture.
Congratulations! That's all it take to make a simple API call using Axios!
# Using the Data
This app is kind of basic right now if you don't do anything with the data, so let's put it to good use. Let's store the URL of the cat image inside a property in our app so we can put it on the screen.
Go into the export default {} block again, and add a catImage property, and let's store the URL in our then block.
<script>
import axios from "axios";

export default {
  name: "App",
  data() {
    return {
      // Were storing the cat image url in this prop
      catImage: null
    };
  },
  methods: {
    fetchNewCat() {
      axios
        .get("https://api.thecatapi.com/v1/images/search")
        .then(response => {
          console.log("Search complete!");
          console.log(response);

          // Add the cat image url to our app property
          this.catImage = response.data[0].url;
        })
        .catch(err => {
          console.log("Search failed!");
          console.log(err);
        });
    }
  }
};
</script>
2
3
4
5
6
7
8
9
10
11
12
13
14
15
16
17
18
19
20
21
22
23
24
25
26
27
28
29
30
Finally, let's create an image on our markup to show our result:
<template>
	<div id="app"><button @click="fetchNewCat">New Cat</button> <img :src="catImage" alt="Cat Image" /></div>
</template>
2
3
Now click the "New Cat" button and behold! (PS. You can click again for new images!)
The entire code of your App.vue file should look like this:
<template>
  <div id="app">
    <button @click="fetchNewCat">New Cat</button> <img :src="catImage" alt="" />
  </div>
</template>

<script>
import axios from "axios";

export default {
  name: "App",
  data() {
    return {
      catImage: null
    };
  },
  methods: {
    fetchNewCat() {
      axios
        .get("https://api.thecatapi.com/v1/images/search")
        .then(response => {
          console.log("Search complete!");
          console.log(response);

          this.catImage = response.data[0].url;
        })
        .catch(err => {
          console.log("Search failed!");
          console.log(err);
        });
    }
  }
};
</script>
2
3
4
5
6
7
8
9
10
11
12
13
14
15
16
17
18
19
20
21
22
23
24
25
26
27
28
29
30
31
32
33
34
You can also see the completed app here: 
# Conclusion and Challenge
Making HTTP calls adds dynamic functionality to your app and is a core functionality to learn for any front-end developer.
Your challenge, if you're feeling bold, is to go to https://docs.thecatapi.com/api-reference and see if you can implement a more complex GET call passing parameters, or even make a POST call to upload your own cat image!
PS. You will need the axios documentation on hand. https://github.com/axios/axios
# Badge

# Author
Made with ❤️ by Marina Mosti